This detailed guide will take you step by step through the process of setting up the Plex Media Server on your Widows PC.
Intro to Plex
While most of you probably already know what Plex is, for those of you who don’t… In a nutshell, Plex is a piece of (free) software that organizes your media, makes your collections look great, and lets you access and stream all of that content from other computers, TVs, gaming consoles, tablets, smartphones, etc. It supports virtually every media file format you can throw at it (including hi-fi music and video formats), it supports Chromecast – you can even share your content with friends and let them stream from your collection.
This guide takes you each and every step of the way through installing and configuring Plex on a Windows PC. Plex works on all modern versions of Windows (Windows 7, 8 and 10). Between the amount of effort and thought that went into making Plex so easy to use and the level of detail in this guide, absolutely anyone can install, setup and start using it in no time at all!

Table of Contents
1. Your Media Files (Before Installation)
2. Installing Plex in Windows
3. Setting Up Plex
4. Configuring Plex Settings
5. Using Plex
6. Plex Apps for iOS, Android and Xbox Overview
Your Media Files
It’s possible that the part of this process that will take you the most time is making sure your audio and video files are easily identifiable by Plex. Hopefully that won’t be the case though, and Plex does a lot of helping :) When you add a media file to Plex it automatically tries to identify that file so that it can download descriptions, cover art, background art etc. Generally Plex looks at the file name itself for information. For example, the best way to make sure that Plex can identify a movie is to name that file the title of the movie.

As illustrated in the above image, I have ‘dots’ between each word in the title rather than spaces (Plex recommends having spaces). Fortunately, Plex is incredibly good at figuring these things out, and it doesn’t actually matter that I use dots instead of spaces.
One thing that will ‘help’ Plex to identify your files is to make sure the year of the movie is in the file name, although it’s only really important if there are two movies with the same name. As you can see in the screenshot below, I had to include the year of the movie Sisters, because there was one made in 1973 and one in 2015.

When it comes to naming the files for TV shows, Plex follows the “standard” of:
Name of Show – S01E01
where Name of Show is the name of the TV series, S01 is Season one (01) and E01 is Episode one (01). Again, it allows for some leeway – it has no problem with my dots instead of spaces and dashes –

In fact, Plex is so good it’s able to disregard information that isn’t important. For example, if you have things like “dvdrip” in the file name, it doesn’t care. All that it’s really looking for is the name of the show and the season and episode numbers.

You can see all of the naming rules, suggestions and info here. Don’t worry too much about the file names as long as they generally adhere to the ‘rules’ we covered above. Anything it has trouble identifying is easily fixable after the initial setup.
Installing Plex
- The very first thing you’ll need to do to install Plex is to sign up for an account. It’s is completely free, but you do need to create an account. Just visit the Plex Sign Up page and fill in the required info.
- Once your account has been created (instant) you’ll be sent an email from Plex with a download link. Click that link (if you have any issues you can always head directly to the Plex Downloads section of their site).
- Select the Windows version of Plex and then click the DOWNLOAD button.
- Once the download has completed run the file to start the installation.
- Click Install when prompted.
- Let it do its thing. It shouldn’t take more than a few minutes for the installation to complete.
- Once it’s has finished installing, click the Launch button to run Plex for the first time.


Set Up
- Your default browser will open and you’ll be prompted to sign into Plex for the first time.
- Enter your user/pass in the space provided and click the SIGN IN button.
- Click the GOT IT! button.
- You’ll be asked if you want to upgrade to a Plex Pass. For the time being, close this window. Once you try out Plex for a while you can decide if you want to pay for the additional features (I do, but I’d still advise you to try it without a Plex Pass first).
- Now you’ll need to give your Plex server a name. Something descriptive is best. Make sure there’s a check in the box labeled Allow me to access my media outside my home and then click NEXT.
- Now it’s time to add some actual media to your media center.
- By default, Plex includes two partially configured “libraries” – but we’re going to work from scratch, so delete them by clicking the red “X” next to Music and Photos
- Yes, you’re sure you want to delete it.
- Absolutely positive. Click YES, I’M SURE
- Now we’ll add your first real library. In Plex-speak, a Library is a collection of ‘similar’ content. For example, your Movies would be considered one library, your TV Shows another, your Music yet another, etc. Click the ADD LIBRARY button.
- First let’s add your movies. Click the Movies icon.
- If you want to call this library something other than Movies, enter that name in the Name field. Then click the NEXT button.
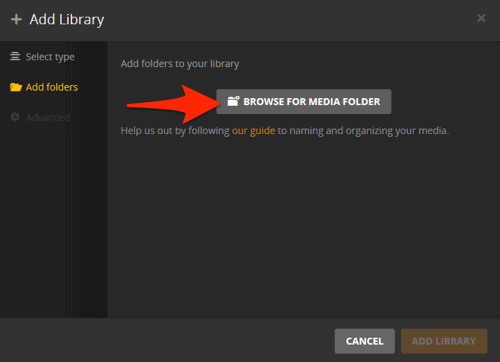
- Click the BROWSE FOR MEDIA FOLDER button.
- Now navigate to the folder you keep your movie files in. Don’t worry if that’s more than one place – we’ll cover that. Make sure you’ve got the correct path in the top field (see screenshot below) and then click the ADD button.
- If you only have one folder that contains your movies, jump down to step #17. Otherwise, click the BROWSE FOR MEDIA FOLDER button again.
- This time, navigate to the other folder that contains movie files and then click the ADD button.
- Click the ADD LIBRARY button to create your movie library.
- As soon as you create a library, Plex will start to index the media files. Don’t be at all surprised if you start to receive on-screen notifications like the one pictured below. Ignore them for the time being.
- Now that you’ve created a movie library, it’s time to create one for TV shows. Click the ADD LIBRARY button again.
- This time, select TV Shows as the ‘type’, edit the name that it will use if you don’t like the default of “TV Shows” and then click the NEXT button.
- Click the BROWSE FOR MEDIA FOLDERS button.
- Navigate to the folder that contains your TV show files and select it. Then, click the ADD button. Repeat the previous two steps if you have more than one folder that contains tv shows.
- Once you’ve created Libraries for Movies and TV Shows, you’ll probably want to make one for your music as well. Click the ADD LIBRARY button again.
- The process for adding music is pretty much the same as movies and TV shows, with a few exceptions. When asked if you want to Create a premium Plex music library! or Create a basic music library, select Create a basic music library. The premium version requires the paid version, and since you can always upgrade your music library later – let’s go with the free one for now.
- There are also a series of Advanced options for adding music files. The two you’ll want to pay particular attention to are: Import from iTunes and Use embedded tags. If you’ve taken a lot of time to tag your music files in iTunes – place a check in that box. If you’ve put a lot of effort into tagging your music files with the exact info you want – place a check in the Use embedded tags box. Again it’s worth mentioning that Plex is really good at identifying files, so don’t worry too much. When you’ve reviewed all of the options, click the ADD LIBRARY button to create your music library.
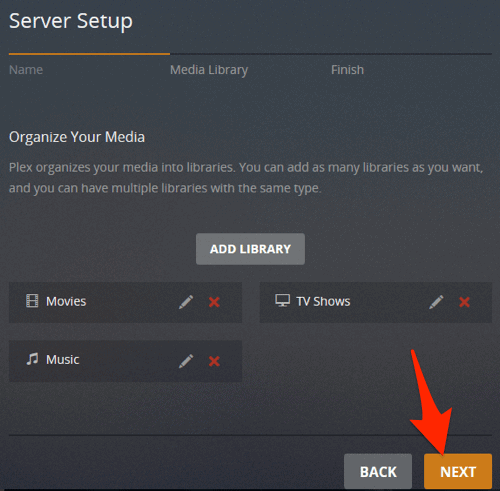
- Now that you’ve added movies, TV shows and music to your Plex media center, it’s time to finish up. Click the NEXT button.
- Click the DONE button. The length of time it takes to identify your media and then download corresponding information and artwork/image files depends almost entirely on just how many files it has to index.
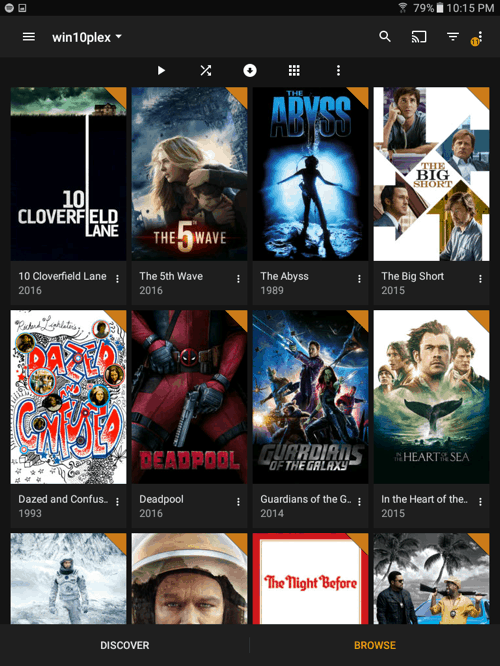
- Once it’s completed the initial indexing you’ll be presented with the absolutely gorgeous Plex dashboard – the main window to all of your now-streamable media :)


Plex Settings
Before you jump in and start using it, let’s take a quick look at some of the settings and preferences. Select the Settings link from the column on the left side of the window.

As you can see, there are a lot of things you can configure. One of them is the ‘name’ that you set way back at the beginning of this guide – you can change it any time.

Another item you’ll want to take a look at before you start getting familiar with the interface is how Plex will look for new movies, TV shows and music that you add in the future. Click the Library item from the navigation column. From here you can set it to ‘watch’ your media folders and update Plex as soon as you copy new files into one of those folders. Or you can have it scan for new content at a preset time.

You can also manually tell Plex to scan for new content at any time – just click the … button directly to the right side of the LIBRARIES item in the main navigation column and select Scan Library Files.

Enough looking at settings and configurations – let’s jump in and use it.
Using Plex
The fun part!
In addition to being able to access your media remotely – you can of course also access it locally – right on the machine you just installed Plex on. Navigate through your content, take a look around and get familiar with the Plex dashboard. While you’re looking through Plex for the first time, you may notice some of the artwork isn’t correct. No problem. We have a detailed guide that explains how to change it (opens in a new window/tab).
The column on the left side of the main window lets you quickly navigate to your “libraries” – TV Shows, Movies, Music etc.

Plex Apps
iPhone/iPad (iOS)
The Plex App for iOS is available on the App Store. The App is free but it’s very limited in functionality unless you’re a Plex Pass subscriber or pay a one time fee of $4.99. If you plan on streaming to your iOS device a fair bit but you don’t want to pay the monthly subscription fee for all the bells and whistles – the one time $4.99 fee is worth every penny.
The App itself is very straight forward and easy to use. If you were watching a movie/TV show on another device, Plex makes it super-simple to resume watching it on your iPhone/iPad.

The layout is beautiful.

The navigation itself is totally customizable.

Similarly to the music and TV show views, the music view also includes background art, info about the artist and album etc.

Android
The Android App for Plex can be found in the Google Play Store. The App is free, but functionality is very limited unless you’re a Plex Pass subscriber or pay a one-time fee to ‘unlock’ it. If you’re planning on streaming from Plex to your Android device fairly often, it’s absolutely worth the purchase. As it happens, the Plex App for Android is also a ‘local media player’ – so any audio or video files already on your Android phone/tablet will also be playable in the Plex App.
Similar to the Plex App for iPhones, the Android App also lets you resume playback from whichever video it was you were last watching.

The layout of the App for Android is quite similar to the look and feel of the Plex Server itself.
Each movie, TV episode and album comes with detailed descriptions, background art, ratings etc.

As you’d expect, all of the features in a great video player are present.

Plex for Xbox
The Plex for Xbox App is completely free. You just need to make sure you’re signed into your Xbox Live account and go through a very simple installation.

The ‘home dashboard’ is a bit less flashy than the Android and iOS versions of of the app, but completely functional and remarkably easy to navigate using a gaming controller.

Less flashy, but still fun and very customized.

You still get detailed info about all of your content – even on the Xbox.

Of course there are many other devices that you can use for streaming Plex (full list here). Using Plex with an AppleTV works fantastically, and I’ve never had issues “casting” my stream to Chromecast. Though I haven’t experimented with it yet, there’s also a Windows app (available via the Windows Store) which provides support for controlling the app via remote control, gamepad, and even using your voice (through Cortana). All in all, it’s a wonderfully easy to use, stable and reliable media server.
ps. You can also share your Plex libraries with friends.
