This detailed guide will explain how to upload files of any size to Dropbox without the need to have them always syncing with a PC or Mac.
Both the procedure and the software we’ll be using will work whether you’re on Windows or a Mac. The steps and screenshots used below are from Windows, but if you’re using a Mac you’ll be able to follow along with no problem at all.
Set Up Dropbox
The first step, and you only have to do it once – is to create a Dropbox folder that will not sync with your computer. If you’ve already created a folder like that you can skip down to the second part below, Uploading to Dropbox.
- Open the Dropbox folder on your computer. Somewhere in there – it doesn’t matter where – create a folder where you want to upload files but do not want them to sync with your computer. As illustrated in the screenshot below, I gave my folder a particularly descriptive name – no_sync.
- Now we’re going to configure Dropbox so that it does not sync that particular folder. Click the Dropbox icon in your system tray and then select Settings (the small “cog” icon) and finally Preferences…
- Click the Sync tab from the top menu. From the Sync section, click the Selective Sync… button.
- Now remove the check mark next to the folder you just created – the one that you don’t want to sync with your computer(s). Then click the Update button. Note: Make sure to repeat the last two steps on any other computers you have connected to your Dropbox account – otherwise the new folder will sync with those computers as well. Unless of course you want that new folder to sync with those computers and just not ‘this’ one.


Uploading to Dropbox
Now it’s time for the fun part.
- Head over to the Cyberduck home page and download the amazing (and free) App that we’ll be using, Cyberduck. The installation is completely standard and straightforward for both the Windows and macOS versions.
- Once it’s installed, launch it from your Apps menu.
- When Cyberduck opens the ‘main’ window will appear. Since this is the first time you’re using Cyberduck to connect to Dropbox, a bit of setup is required. Each time you want to upload to Dropbox in the future all you’ll need to do is open Cyberduck and double-click the Dropbox bookmark that we’re about to create.
- Select Bookmark from the top menu and then New Bookmark from the drop-down list.
- The default connection type will be set to FTP and we need to change that. Click the ‘down arrow’ (see screenshot below) to expand the full list of connection types.
- Select Dropbox from the list.
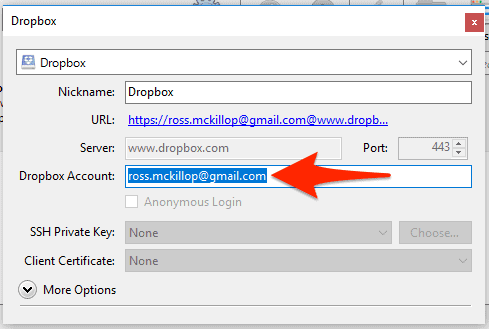
- In the Dropbox Account: field enter the email address that your Dropbox account is associated with (the one you used to sign up for Dropbox). Though it’s not required, you may want to change the Nickname that this connection will use. I just shortened mine to “Dropbox”. When you’re ready,
close this window. - The ‘main’ Cyberduck window will now have a new entry in it – Dropbox. Double-click it.
- This next step is only required this one time. A Cyberduck OAuth2 Authentication window will appear and a browser window will open. Switch to the browser.
- If you’re prompted to sign into Dropbox, do so. Click the Allow button, granting Cyberduck access to your Dropbox account.
- Dropbox will now generate a a code for you to use with Cyberduck. Copy that code to your clipboard (select it all so that it’s highlighted, right-click it and select Copy).
- Back in the OAuth2 Authentication window, paste your Dropbox code in the Authentication Code: field. Make sure that Save password is selected so you don’t need to do this step next time and then click the Login button.
- Cyberduck will now sign in to your Dropbox account and all of your Dropbox folders will be displayed. Locate the one you created way back at the beginning of this guide and open it.
- Now just drag-and-drop the files you want to upload into the Cyberduck window.
- This will upload the files to that folder – and since that folder was configured not to sync with your computer, they won’t!
- Once the transfers have completed you’ll be notified via the Transfers window.
- Now you can move/delete the files on your local computer and a copy of them will remain on your Dropbox account. If/when you do wish to access these files you can use either Cyberduck or the Dropbox Web interface.
- That’s it! Going forward, every time you want to upload files to Dropbox and have them not sync with your computer, just launch Cyberduck and select your Dropbox bookmark.