This brief tutorial will show you how to use MediaMonkey to manage your iPod.
Please note: This guide was authored back in 2007 and obviously, quite a bit has changed since then. MediaMonkey still exists, and is supported in Windows all the way up to and including Winodws 10. It even works with more than just the iPod – a full list of compatible devices can be found here. With that said, the following steps and screenshots have probably changed quite significantly.
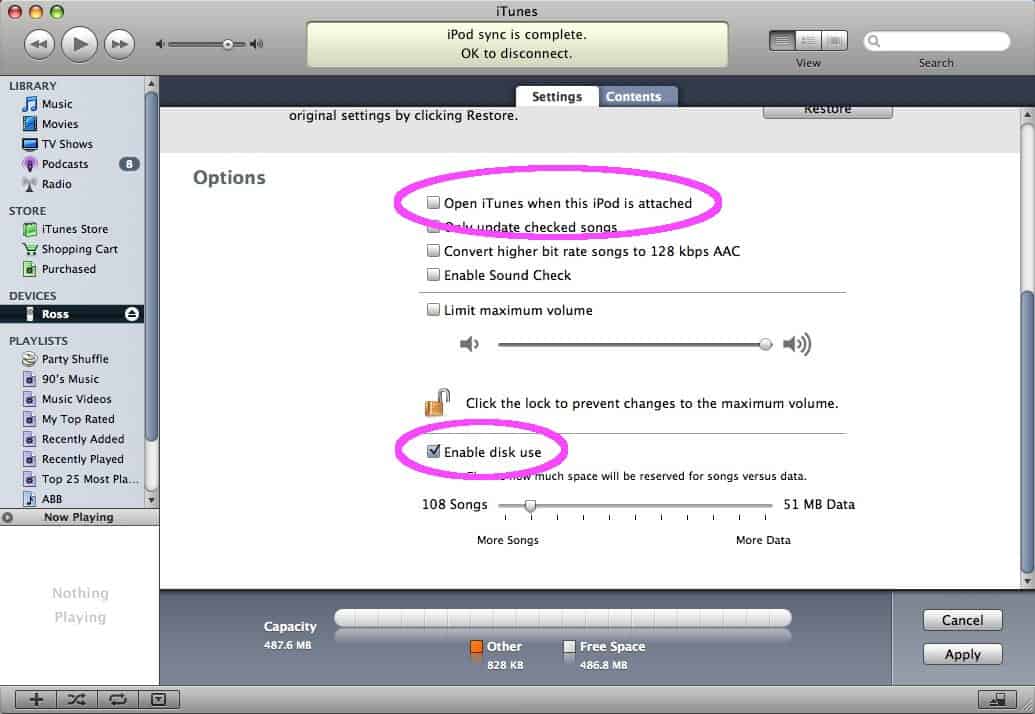
- First, make sure to enable disk use on your iPod by connecting it and opening iTunes (if it doesn’t auto-launch). Select your iPod and then click the Settings tab. Scroll down to the Options section and remove the check from the box labeled Open iTunes when this iPod is attached. Then place a check in the Enable disk use box (if it isn’t checked already). Click Apply.
- Exit out of iTunes, and confirm that your iPod has now mounted itself as a drive.
- Download and install MediaMonkey if you haven’t yet. When you run it for the first time you’ll be presented with a brief setup wizard. The first screen explains the differences between the paid and free versions, and lets you know what it’s going to do next. Click OK to continue.
- From the top part of the Add Folders window, select any of the drives/folders you want MediaMonkey to scan for audio files. From the bottom part of the same window, select the type of files you want MediaMonkey to scan for. Click OK when you’re ready.
- MediaMonkey will also auto-detect many other audio players on your system, and ask if you want to import information associated with them. Click OK or Cancel depending on your preference.
- And now MediaMonkey will launch. Use the left side column to navigate to some of your music (via Artists, Album, Genre etc.)
- Plug in your iPod if it isn’t already, highlight a few tracks, and drag them to the iPod entry in the left column.
- The bottom section of MediaMonkey will display the transfer status.
- When the transfers have completed, select your iPod from the left column to confirm the tracks were uploaded.
- Right-click on your iPod in MediaMonkey and select Safely remove device when you’re ready to disconnect your iPod.
- That’s it – you’re done. Happy listening.