This guide will show you how to resize partitions and create new ones using the GParted Live CD/USB utility in Linux.
Sometimes you want to change your partition layout after you’ve been using your system for awhile. One great tool for this job is the GParted Live CD/USB, which is what I’ll use to show you how to resize a partition and then create a new one with the free space.
- Once you’ve downloaded and burned the GParted .iso file to a disc or used it to create a bootable USB stick, boot from it and select GParted Live (Default settings) from the list of options
- When prompted to select your keymap just press Enter and keep the default of Don’t touch keypad
- Enter the number that corresponds with the language you’d like to use, or just hit Enter to use the default, which is English.
- When you’re asked which “mode” you’d like to use, hit the Enter key to accept the default, which is Continue to start X to use GParted automatically
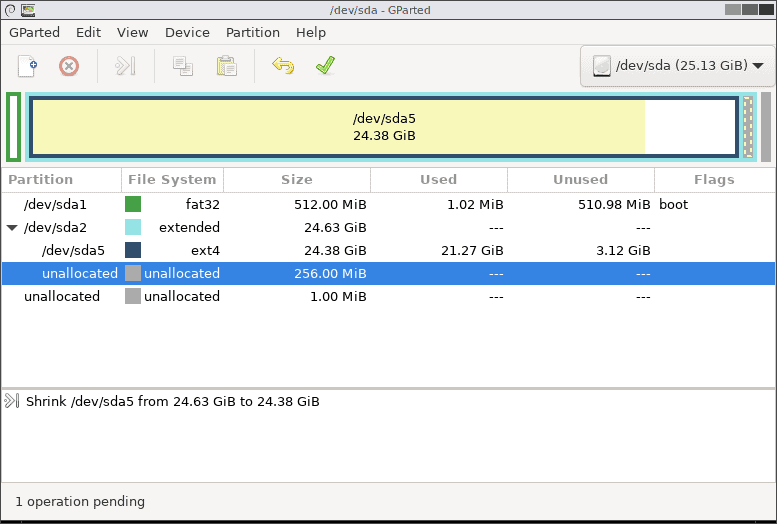
- Finally, the graphical interface to GParted will appear. Select the partition you wish to resize from the list of partitions in the bottom part of the panel. For this example I’m going to use my main Linux ext4 partition, /dev/sda5. Select the partition you wish to resize.
- Click the Resize/Move button located in the top toolbar.
- Ultimately I want to create a new 256MB partition to use for encrypted text files and documents. So from here I want to resize my main partition by ‘removing’ 256MB from it, to use as the new partition. That’s the number I’ll input in the Free space following (MiB): field. When you’ve made your selections, click the Resize/Move button
- First make sure that there’s a new “operation pending” in the lower part of the GParted window. To create a new partition out of that newly freed up space (256MB) – select the unallocated partition matching that size.
- Now click the Create new partition button from the top toolbar.
- Most of the Create new Partition window you’ll want to leave as it is. The two items you’ll definitely want to make sure to review are the File system and Label:. I’ve opted for the default ext4 as the file system, and I’ve named my soon-to-be-created partition “private”. When you’ve made your selections click the Add button.
- There should be two items in the operations pending section – one to resize the main partition, and another to create a new partition. When you’re ready, click the Apply All Operations button from the toolbar.
- Click Apply on the confirmation window.
- Now sit back and let GParted do its thing. This can take anywhere from less than a minute to “quite a while” – depending on the size and speed of your drive, the amount that’s being resized etc. When it’s done, click the little arrow next to Details to expand that menu.
- You should see two items – both with green ‘check marks’ after them, indicating everything was successful. Click the Close button.
- Back in the main GParted window, you’ll see a newly created partition.
- Exit out of GParted by selecting GParted from the menu bar, and then Quit from the list.
- Exit out of the live CD/USB key by clicking the big red Quit button.
- The next time you boot into Linux you’ll see your newly created partition!
- That’s it – now you know how to work with Linux partitions.