This step by step guide will show you how to setup Remote Desktop Access in Ubuntu, so that you can connect to it from Windows, macOS or other Linux PC’s.
Even though guide was initially published back in 2010, it has been updated to be current in 2021 using (up to and including) Ubuntu 21.04 “Hirsute Hippo”.
Back in 2010 it was a bit more complicated and involved to connect to a computer running Ubuntu and control it as if you were sitting in front of it. Thanks to some great advances in remote desktop access software, it’s easier than ever. First you’ll need to setup Ubuntu to accept connections from other computers. Then we’ll show you how to connect to Ubuntu from both Windows and macOS.
Setup Ubuntu for Remote Desktop Access
- The first thing to do is install xrdp. Fortunately it’s as easy as typing four words – open up a Terminal and enter the command:
sudo apt install xrdp
- If you’re using a firewall you’ll want to open port 3389 to allow incoming connections, so enter the command:
sudo ufw allow from any to any port 3389 proto tcp
- If you want xrdp to start each time Ubuntu boots up, enter the command:
$ sudo systemctl enable –now xrdp
- If you’d like to start and stop it manually, use:
sudo systemctl start xrdp
and
sudo systemctl start xrdp
- Once you’ve got xrdp running on your Ubuntu computer, proceed with the steps to connect to it from Windows or macOS.


If you’re concerned about opening ports (probably should be, esp. if the Ubuntu computer is accessible via the Internet) see the ufw documentation to add some access rules to port 3389.

Connect to Ubuntu From Windows
Please note: these steps and screenshots are specific to Windows 10. With that said, you should have no trouble following along if you’re using Windows 7.
- Click the Windows Search button and search for the word “remote”. Select the result named Remote Desktop Connection
- Click the ‘down arrow’ icon next to Show Options
- Enter the IP address of the Ubuntu computer that you want to connect to, and the username of the account you want to connect as. Then place a check in the box labeled Allow me to save credentials. When you’re ready, click the Connect button.
- Enter your password when prompted. If you want the Windows Remote Desktop Access client to save your username and password so you don’t have to enter them each time you connect, place a check in the box labeled Remember me
- Before you’re connected to Ubuntu, you’ll be asked to confirm you want to proceed without a trusted certificate. Place a check in the box labeled Don’t ask me again for connections to this computer and then click the Yes button.
- Ta-da! You can now use and control your Ubuntu computer from Windows just as if you were sitting right in front of it.


Connect to Ubuntu From macOS
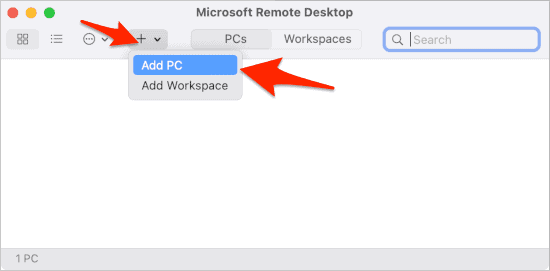
- First things first, download and install Microsoft Remote Desktop from the App Store (free). After the installation has completed, launch it from your Applications folder. Once it’s opened, click the “plus sign” button in the Toolbar and select Add PC from the menu.
- Enter the IP address of the Ubuntu computer in the PC name: field and make sure the User account: is set to Ask when required. Enter something like “Ubuntu” in the Friendly name: field. Finally, click the Save button.
- Double-click the newly created ‘Ubuntu’ tile.
- When a message about a certificate appears just click the Continue button and sign into Ubuntu.
- There’s Ubuntu! You can now access your Ubuntu desktop from your Mac.