This step by step guide will walk you through adding and configuring a PPTP VPN in Ubuntu. It uses the steps and screenshots for Ubuntu 14.04.2 LTS (Trusty Tahr – which is the current LTS) but are very, very similar to previous versions of Ubuntu. If you’re running something prior to 14.04.2, such as 12.04.5 LTS (Precise Pangolin) – you’ll have no trouble following along.
Out of the box, Ubuntu supports PPTP and without any additional Apps installed. To connect, you’ll need the VPN server address in addition to your username and password. I strongly recommend and endorse the VPN service provided by Private Internet Access, which works perfectly with Ubuntu.
Let’s get started!
- Click the Networking icon from the main Menu Bar. Select VPN Connections and then Configure VPN….
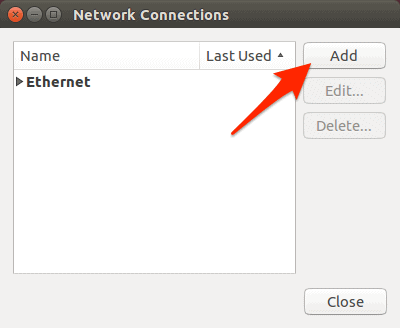
- Click the Add button.
- Click the “down arrow” (see screenshot below) from the Choose a Connection Type
- Select Point-to-Point Tunneling Protocol (PPTP)
- Click the Create… button.
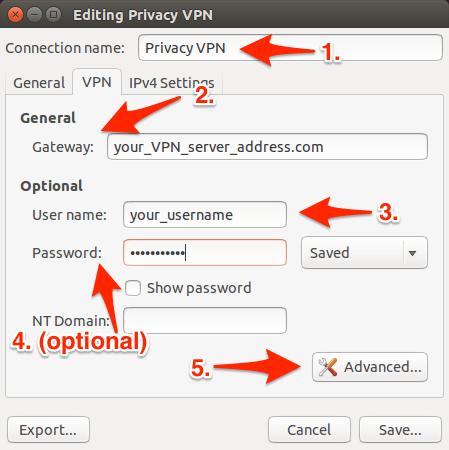
- This is the screen where we’ll configure all the settings for your VPN. Start out by entering a Connection name: – something descriptive is always best, but you can name it anything you want. In the Gateway: field enter in your VPN Server Address. Follow suit for the User name: field. You can enter your password, or you can opt to have your VPN require you to enter your password each time. Finally, click the Advanced… button.
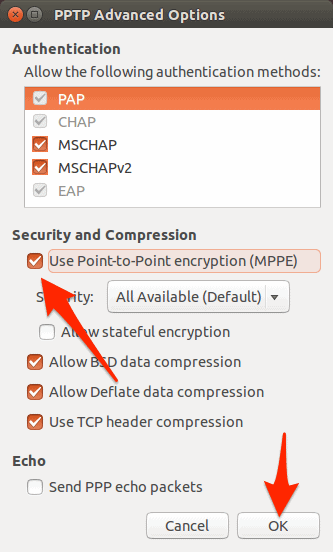
- Place a check in the box labelled Use Point-to-Point encryption (MPPE) and then OK.
- Finally, click Save…
- Back at the Network Connections window, click the Close button.
- Now it’s time to connect to your VPN! Click the Networking icon in the main Menu Bar again, select VPN Connections, and this time, click your newly created VPN connection.
- After a few moments a VPN Login Message will appear, confirming your connection has been successfully established.
- That same Networking icon will now have a small ‘lock’ (see screenshot) as long as you’re connected to your VPN.
- That’s it! You’re all done.