How to Set Up a VPN in Windows 10

This guide will take you each step of the way through setting up and configuring a VPN on your Windows 10 PC/laptop/tablet.

If you don’t have a VPN service yet, or you’re unhappy with your current one, I strongly recommend and endorse the VPN service provided by Private Internet Access, which works seamlessly with Windows 10.

Windows 10 supports several VPN protocols “out of the box” (no additional software is needed). Those protocols include PPTP and L2TP/IPSec – two of the most common VPN types. It doesn’t matter if you have no idea what any of that means, just make sure your VPN service supports one of those two (Private Internet Access supports both).

Let’s get started!

  1. Click the Windows 10 “Start Button” and select Settings
  2. Click the Network & Internet entry.
  3. From the column on the left side of the screen, select VPN
  4. On the right side of the screen, click Add a VPN connection
  5. Now it’s time to configure your VPN. Start out by selecting Windows (built-in) from the VPN provider pull-down menu. Then enter a name in the Connection name field. It doesn’t matter what you call it, but something descriptive is always best. Next, enter your VPN server address in the Server name or address field. Click on the VPN type pull-down menu…
  6. and select your type of VPN connection. For the sake of this tutorial we’re going to use Point to Point Tunneling Protocol (PPTP), but the steps for Layer 2 Tunneling Protocol with IPSec (L2TP/IPSec) are very similar, and you should have no trouble following along.
  7. For the Type of sign-in info select User name and password. The User name and Password fields are actually optional. This means each time you connect to your VPN service, you’ll be prompted to enter your username and password instead of having that information saved. Similarly to how you have your home WiFi set up, your probably don’t have to enter your password every time you connect to it. One “meet in the middle” solution for your VPN is to enter your user name, but not password. That way you’ll always be prompted for your password, but not your user name (which can often be a series of random numbers and letters). There is no “wrong” decision, it’s a matter of just how secure you want your overall system to be.
  8. When you’ve entered all of the info (or left blank in the case of the optional fields), click the Save button.
  9. Now you’ll see your newly created VPN connection listed in the VPN section. Click it.
  10. Time to test the new connection! Click the Connect button.
  11. If you opted not have to have Windows remember your user and/or pass, you’ll be prompted to enter them. After a few moments, the status will change to Connected.
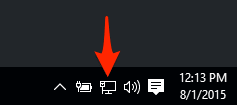
  12. To quickly monitor your VPN connection status, click on the Networking icon in your Windows System Tray.
  13. At the top of the menu, you’ll see your VPN connection status listed with your Internet connection status. You can also disconnect to your VPN from here, just click on the entry…
  14. and you’ll be taken right back to the VPN section. Click the Disconnect button when you don’t want to use your VPN.
  15. That’s it!

If this article helped you, I'd be grateful if you could share it on your preferred social network - it helps me a lot. If you're feeling particularly generous, you could buy me a coffee and I'd be super grateful :)

buy a coffee for simplehelp.net


Home » Security » How to Set Up a VPN in Windows 10

31 thoughts on “How to Set Up a VPN in Windows 10”

  1. Oh God Finally got it because I am using wifi network but VPN application doesn’t work and then I landed on this tutorial and found a genuine way to set up my own VPN on windows 10 as well as on my android device. Thank you so much!

  2. I also have window 10 in my system and initially I was very curious about how to set up a VPN in windows 10. Thanks for posting great stuff!

  3. How set up , or stop dns leaking if possible.
    How would the statement be writen , and were to place it ?

    No sence running a VPN if it’s leaking dns

  4. Jeevan Sunkersett

    Helpful article.

    But it is not helping me.

    In your article you mention “select the type of your VPN connection”.

    How to determine that?

    In my case on Windows 10, I need to install a special desktop software – from F5 and it works in conjunction with a numeric OTP (one time password) generated on my smartphone.

    So would you have published a article for this scenario.

    thanks

  5. this make me anonymous while surfing the web right? if not is pptp a type of vpn and will it do the same job basicly i need a vpn pls help

  6. Brendan Betheldo

    Hey Teddy,

    Just add the domain before your username eg:

    ‘ mydomain/brendanbetheldo ‘

  7. In case anyone else is having this issue PIA uses a different set of Usernames and Passwords for PPTP/SOCKS VPNs than the set you use for their app. You can find out what they are in your account section of their website.

    PIA works fine for me using the right user/pass set

  8. I generally like to go by the rule of ‘one less App to run is a good thing’. That said, there are some real benefits to using the PIA App, based on what you use PIA for. I’m honestly not sure how you’d figure out which port was open if the PIA App didn’t tell you (I’m sure it’s possible but I’m also sure it’s not nearly as easy as finding it in the PIA App). If you connect to a *lot* of the different VPN servers that PIA offers – then the app is definitely for you. I use the PIA App on my Mac, but built in VPN (like this tutorial) in Windows 10 – but that’s based on ‘my’ needs.

  9. After the username and password it says “the remote connection was denied because the username and password combination is not recognized or the selected authentication protocol is not permitted on the remote access server.”

    I have verified the username an password at least 5 times and tried the addresses for servers in three countries USA East, Canada Toronto, UK London. I have also tried both the p2p tunneling as well as l2tp VPN type with the same lack of success.

    The username and password work on the PIA app on my Surface as well as my Android phone but not for the built in Windows VPN

  10. Windows keeps adding Domain:MicrosoftAccount , how do I change this to be what my work has provided. Never had this issue with Win7 as I could always just change the field

  11. Looks like in good Windows philosophy, they have “simplified” this. The build-in VPN tool can only use the default port which is 1723.

    I am not 100% sure, but if I am right, then the build-in VPN is not usable for many ppl for a really crazy reason. I mean, ppl who understand what a VPN is, will certainly understand what a port is. There is really no need to simplify things for this group of ppl.

  12. Silly question, but how do you specify the port number for the server? The format:

    ip_address:port_number

    doesn’t seem to work.

Leave a Comment

Your email address will not be published.