This guide will take you each step of the way through setting up the Windows 10 Mail App to work with your @comcast.net email address.

Note: if you’re trying to access Comcast’s Webmail (and that’s all), you’ll only need to follow the first two steps – updating Windows 10. After that, you should be able to sign into Comcast’s Webmail without issue.
- The very first thing you’ll need to do is ensure your copy of Windows 10 has all of the Updates installed. There were several issues causing problems for Comcast.net email, for both webmail and the Windows 10 Mail App, until Microsoft released an update that includes a fix for the problems. To run the Update click the Windows 10 “Start” button and select Settings. Locate the Update & security section, and click/tap it.
- If there are any Updates waiting to be installed – install ’em :) If a reboot is required make sure to save any open work first. Use the Check for updates button until it says that your device is up to date.
- If you were having problems signing into Comcast’s Webmail, they should now be resolved. To set up the Mail App, keep reading.
- There are only two things you’ll need to know ahead of time in order to set up your Comcast email in Windows 10 – your comcast.net email address and the password associated with that account. If you know those two things, you’re ready go to!
- Open Mail by clicking the “Start” button and then selecting All apps
- Scroll down to the M section and select Mail
- If you don’t have any accounts set up in Mail (yet), you’ll be presented with a Welcome screen. If this is the case, click the Get Started button and continue to the next step (#8).
If you do have another email account already set up, instead of being presented with a Welcome screen, your Mail will open. If this is the case for you, jump down to step #9.
- Click the + Add account button and then skip down to step #11
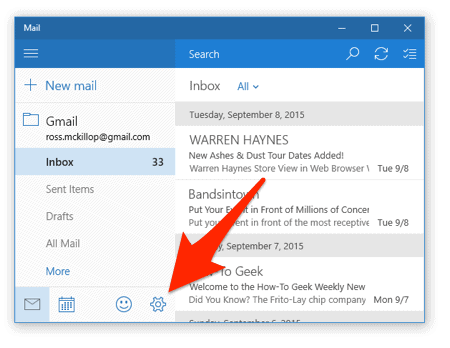
- Click the “Cog” or “Gear” icon located (by default) in the bottom corner of the left column in the Mail App (see screenshot below).
- Once the Settings menu appears, click the Accounts menu item. From here, click the + Add account button.
- From the Choose an account list, scroll down and select Advanced setup
- From the Advanced setup list, select the second entry, Internet email
- Now you’re going to enter a bunch of settings. The first is to add an Account name¹. This can be anything at all, but descriptive is usually best. Next up, enter the name you want your email to be “sent from” ². Typically this would be your first and last name. In the Incoming email server field ³ enter in: imap.comcast.net and from the Account type drop-down 4, select IMAP4
- In the User name field ¹ enter in your Comcast user name. This is the first part of your email address – the part before @comcast.net. For example, if your email address was simplehelp@comcast.net, you would enter simplehelp as your User name. Then enter your password in the Password field ². In the Outgoing (SMTP) email server field ³, enter: smtp.comast.net
- Almost done! Make sure that all of lines that have “check boxes” do have checks in them. Click the Sign-in button.
- Finally, click the Done button.
- Congratulations – your Comcast email is now set up and ready to go in Windows 10!