How to upload a website built with iWeb to a non .mac/MobileMe account

by Ross McKillop on July 15, 2008

Mac Web Design & Dev

Publishing a web site using iWeb to a .mac or MobileMe account is dead simple. Publishing to your own server/hosting company isn’t difficult, but this tutorial will show you how to make it even easier - and much faster, especially if you have a large site.

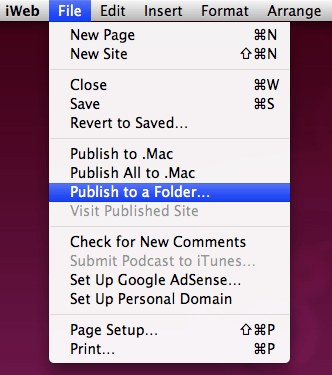
  1. Start by “publishing” your site to a local folder. When you’re done updating your pages, click File -> Publish to a Folder…
  2. publish to a folder in iweb
    click to enlarge

  3. Navigate to the folder on your hard drive you want to publish (save) your site in. If you haven’t yet, make sure to enter the URL for your site in the space provided. Click Choose when you’re done.
  4. selecting a folder on your hard drive to publish your iweb site
    click to enlarge

  5. After your site has been successfully published to a local folder, you’ll be prompted with a message telling you just that. Click OK.
  6. iweb confirming a successful local publish
    click to enlarge

  7. Now download and install w2w. It’s a small, free, and very easy to use utility. To install it, just unzip the file and drag it to your Applications folder. Launch it from there.
  8. w2w in the applications folder
    click to enlarge

  9. Click the + (plus) button.
  10. w2w setup window

  11. Enter the appropriate info for your web server. Click the Browse button and navigate to the local folder you published your site in (back in step #2).

    If your web host/server has a specific folder that you have to put web files in, enter that folder in the Remote folder field. For example, when you FTP or SSH to your web server, if you have to put files in a sub-directory of your home folder titled www - enter www.

  12. w2w site info window

  13. Once you’ve filled in the required fields, click the Upload button.
  14. w2w upload

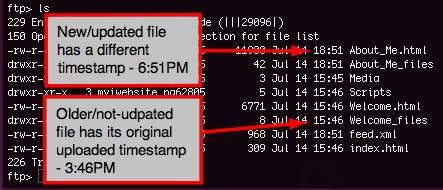
  15. What makes w2w particularly helpful, aside from its ease of use, is that it will only upload files that have changed (or new files). This saves time, because you won’t need to upload every file just to make sure the new/updated ones are sent.
  16. file listing displaying different timestamps

  17. The next time you update your site using iWeb, just re-publish to your local folder, then launch w2w and click the Upload button (you won’t need to re-enter your site info as it’s saved).
[Digg] [del.icio.us] [Facebook] [Google]
Related Posts:
  • How to insert a Google Map into your website using iWeb
  • How to use CyberDuck to FTP files in OS X
  • Simple Help Contest - Win a 30GB annual SugarSync account
  • How to delete your Plaxo account (and why you want to)
  • How to automatically upload pictures from your mobile phone to Flickr
  • { 7 comments… read them below or add one }

    1 Stew 07.30.08 at 1:20 am

    Hi there, In step 8. you say that it will only upload changed or new files, the problem is when you “publish to folder” in iWeb, it updates the date and time on EVERY file. So using this method it will always upload the entire site :(

    Any help would be appreciated.

    2 Ross McKillop 07.30.08 at 2:10 am

    Stew -

    Which version of iWeb are you using? I can confirm for certain that v2.0.4 does not update the timestamp of the files that haven’t changed.

    3 Stew 07.30.08 at 2:43 am

    Hi,

    I have v2.0.4

    As a test I opened finder in my site folder (list view so I could see the modified dates).
    Then in iWeb I did a “Publish to Folder”
    Then in finder I watch as ALL my site files are removed and recreated with new date time stamps Today, 11:40

    4 Carlos Neumann 08.04.08 at 3:28 pm

    Hi Ross, I wonder if you could help me out.

    We’re redoing our whole website, it will now be hosted by Netsuite (they host all the back end of our business as well, accounting, CRM, etc…).

    I want to transfer some of the info we had in the old website into the new one, but since the design has changed I can’t use the exact same html. I was thinking of creating new html files in iweb and then uploading those to be served as content by Netsuite.

    The thing is, since iWeb creates whole websites (not just individual pages) there’s a lot of structure info which will probably break.

    As I’m sure you can tell I’m new to html publishing, I was hoping it’d be almost as simple as creating the new file and uploading it as a self-contained unit but I’m getting the feeling it’s a bit more complicated.

    I don’t know if I using a different program would help. My only previous experience was with a software called Freeway which put me pretty much in the same situation.

    I’ll appreciate any help.

    Carlos

    5 Benny 08.14.08 at 4:53 am

    Hi Stew,
    I can confirm that only the modified files are uploaded to my ftp site. As a test; create a dummy site, upload it using w2w. Make 2 simple modifications and upload each of them individually; note the time taken for the upload to complete. I noticed a significant reduction in upload times. I have to conclude that not all files are uploaded….

    6 Fredrik 08.17.08 at 12:36 pm

    @Stew

    I believe the difference is that you are looking at the local site-folder, not the uploaded files. What w2w will do is look in the site-folder for files that have had their content modified and only upload those, so if you look at the files at the actual web-server, you will see different modification dates.

    7 matt 08.28.08 at 3:23 am

    hey,

    having a lot of trouble uploading mu iWeb site to a non mac server. Have appeared to do all the right things, and can see my files on my host account, but keep getting error 404 or 403, or a very mangled version of my home page with no links. Is this something to do with using version 1.1.2? I have been using Cyberduck amongst others and the upload seems fine.

    any help welcome

    thanks

    matt

    Leave a Comment

    You can use these HTML tags and attributes: <a href="" title=""> <abbr title=""> <acronym title=""> <b> <blockquote cite=""> <cite> <code> <del datetime=""> <em> <i> <q cite=""> <strike> <strong>