If you’ve tried Ubuntu on your Eee PC, or have dual-booted Ubuntu and Windows XP, and you’re still not happy – give Fedora (the custom version titled “EeeDora”) a try. This tutorial will guide you every step of the way though installing Fedora (EeeDora) on your Asus Eee PC.
Installing EeeDora on your Eee PC is actually quite easy. There are a couple of things you’ll need to download before you get started. First is the EeeDora .iso image Update: download site is gone and software has been discontinued. The EeeDora image is just under 350MB, so the download shouldn’t take that long. There are two ways to get EeeDora installed on your Eee PC. The first is to use the tool liveusb-creator to transfer your EeeDora image onto a USB thumb drive. That’s the method we’ll outline in this tutorial. The other is to burn the EeeDora image to a CD, and boot from that CD – which requires you have an external USB CD/DVD drive you can plug in to your Eee PC. If you need help burning an iso to CD, here’s a tutorial on how to do just that in Windows.
- Open the liveusb-creator folder, and double-click liveusb-creator.exe
- Click the Browse button from the Use existing Live CD section.
- Navigate to the EeeDora .iso file, select it, and click Open
- Select the drive letter that represents your USB thumb drive from the Target Device drop-down menu. In my case (see the screenshot below) – my USB thumb drive is E:
- Click the big Create Live USB button from the bottom of the window.
- After a minute or two, the process will be completed. Exit out of liveusb-creator, and use the Windows “Safely Remove Hardware” utility in your system tray to remove/eject your USB thumb drive.
- Now it’s time to install EeeDora (Fedora) on your Eee PC. The first and most important step is to back up everything on your Eee PC before you begin. Using the steps outlined in this tutorial, you will be wiping the drive clean, so any/all existing files will be erased. Back them up now, or they’ll be gone forever.
- With your Eee PC turned off, plug in the thumb drive that you just put the EeeDora image on. Turn on your Eee PC, and tap the Esc (escape) key a few times while it boots up. You should be presented with a window asking you which device you want to boot from. Select the USB thumb drive.
- Your Eee PC will now boot into Fedora. This is the “live” version, so you actually have access to the entire Operating System right now. Feel free to play around and check it out. If you decide EeeDora isn’t for you, you can power off your Eee PC, unplug the USB thumb drive, and boot back into your previous Operating System. Nothing will have changed.
- If you decide you like what you see, double-click the Install-Live-Image icon on your desktop. This will take you through the process of installing Fedora on your Eee PC (and again, just to stress it, all of your files will be deleted).
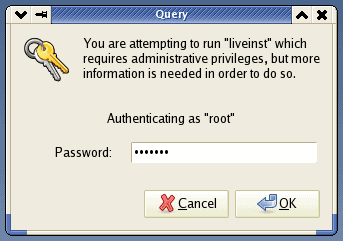
- You’ll need to authenticate as root in order to install Fedora. Enter the password eeedora (all lower case) in the space provided, and click OK.
- Click Next on the initial installation screen.
- Select the keyboard layout you want to use in EeeDora, and click Next.
- Here’s where it gets just a tiny bit tricky. Different models of the Eee PC come with different drives. Some, like mine, have a single (12GB) drive. Others have multiple drives. If yours has just one, this is actually a very simple step. Make sure it’s selected and then click
Next. If yours has more than one, you’ll want to select the first drive, and then click Next. That will install EeeDora on your first drive, leaving the second one alone. You can use the second to store files, or mount it as your home directory. - Now you’ll get a ‘warning’ message asking you to confirm that you do indeed want to wipe the data from that drive, and install EeeDora on it. Click Yes.
- Select your time zone from the drop-down list, and click Next.
- Choose a new root password and enter it in the fields provided. It’s probably not a good idea to stick with the default (eeedora). Click Next.
- Now you’re at the final installation screen. Review the info and then click Next.
- You might want to take this time to grab yourself a beverage. The installation doesn’t take a super-long time, but it’s not particularly entertaining to watch either.
- If you do decide to watch it, you’ll be updated along the way.
- A few times..
- Until the installation has completed. Once it’s done, click Close. Quit EeeDora (the small “quit” button in the bottom left corner of your screen) and power off your Eee PC. Remove the thumb drive, and start it up again. You’ll boot into your newly installed EeeDora.
- That’s it – you’re done!