This guide will show you how to speed up your web browsing by switching from your current DNS settings to use the free DNS servers provided by Google.
DNS (Domain Name System) translates website IP addresses to names that are easy to remember. Behind every “anywebsite.com” there is an IP number associated with it. Chances are you’re using your Internet Service Provider’s DNS server, and sometimes they can be slow at translating the IP addresses, thus making pages load slow.
We’ll be taking a look at other DNS alternatives, then wrap it up by showing you how to test the speeds of them versus your ISPs and find out which works fastest for you. To start, here we take a look at adding Google Public DNS to your system. Click here for additional info about the Google Public DNS service.
For this tutorial we’ll take a look at setting it up using a Cisco Linksys E2000 Wireless Router and in Windows 10. If you own a different router or are using a different version of Windows the steps won’t be identical, but similar enough that you shouldn’t have any problems following along.
Add Google Public DNS to a Router
1. First we’ll take a look at adding Google Public DNS to a Linksys router. Open your default browser and enter your router’s IP address in the address bar. For most Cisco Linksys routers the IP is 192.168.1.1 – if you have a different router consult the documentation or check the manufacturer’s website to find out what it is.
![sshot-2011-02-07-[22-53-54]](https://www.simplehelp.net/wp-content/uploads/sshot-2011-02-07-22-53-54.png)
2. Then you’ll be prompted to enter in the User Name and Password for the router and click OK. If you’re not sure what the password is – again turn to the documentation.
![sshot-2011-02-07-[22-59-34]](https://www.simplehelp.net/wp-content/uploads/sshot-2011-02-07-22-59-34.png)
3. Then under the Basic settings under Network Setup and the DHCP Server Settings section enter the following into the Static DNS 1&2 fields – 8.8.8.8 and 8.8.4.4
It doesn’t matter which order you enter them in, just make sure you’re using the correct numbers. Then at the bottom of the screen make sure to click Save Settings.
![sshot-2011-02-07-[23-04-57]](https://www.simplehelp.net/wp-content/uploads/sshot-2011-02-07-23-04-57.png)
4. Then a new page will come up verifying the configuration changes have been set – click Continue.
![sshot-2011-02-07-[23-05-26]](https://www.simplehelp.net/wp-content/uploads/sshot-2011-02-07-23-05-26.png)
5. Now click on the Status tab and under Internet Connection you’ll see the DNS settings have been successfully changed.
![sshot-2011-02-10-[02-42-46]](http://www.simplehelp.net/wp-content/uploads/sshot-2011-02-10-02-42-46.png)
Add Google Public DNS to Windows
If you aren’t using a router (or would rather not change its settings) you can still use Google’s public DNS by editing your Windows TCP/IP settings, which is super-easy.
- Click the Windows Search button (or use the keyboard combo Windows key + S to open the Search panel) and enter the word network in the search box. Select View network connections from the list of results.
- Locate your current Network Connection (probably Wi-Fi) and double-click it.
- Click the Properties button.
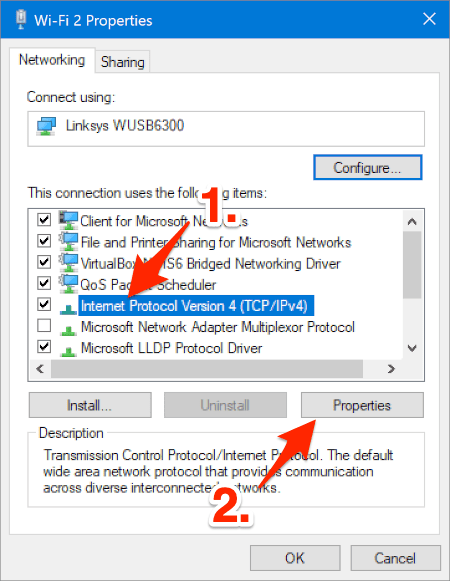
- Select Internet Protocol Version 4 (TCP/IPv4) by clicking on it once, and then click the Properties button.
- Select the Use the following DNS server addresses: option, and then enter 8.8.8.8 as the Preferred DNS server: and 8.8.4.4 as the Alternate DNS server:
- Click OK and close out of the other open windows. That’s it! You’re now using the Google Public DNS servers and should notice that web pages start to load faster.