This detailed guide will take you every step of the way through installing Internet Explorer 9 on your Mac – using nothing but free software.
Important: There are a couple of things you should know before you undertake this (quite easy, albeit lengthy) endeavor. You will require approximately 26GB (yes, gigabytes) of free space in order to install IE 9 using the method outlined below. Once the installation is complete, you’ll be able to delete all of the files required for the set up, but you’ll still be using approximately 13GB of disk space to run IE 9.
The installation involves downloading 13+GB of data – so you may want to run the initial download overnight, depending on the speed of your Internet connection.
It’s also worth mentioning that while there are other methods to install Internet Explorer on your Mac, this is the only one that I have found to consistently run IE 9 correctly (no crashing, no problems rendering web pages etc). If the above requirements don’t scare you off, here are the steps to install IE 9 on your Mac.
- The first thing you’ll need to do is install VirtualBox, if you don’t have it installed on your Mac already. Head over to the VirtualBox download page and download VirtualBox for OS X. The installation is very straight forward – run the installer package and click ‘Next’ a bunch of times. Once completed, don’t open VirtualBox, just proceed to the next step.
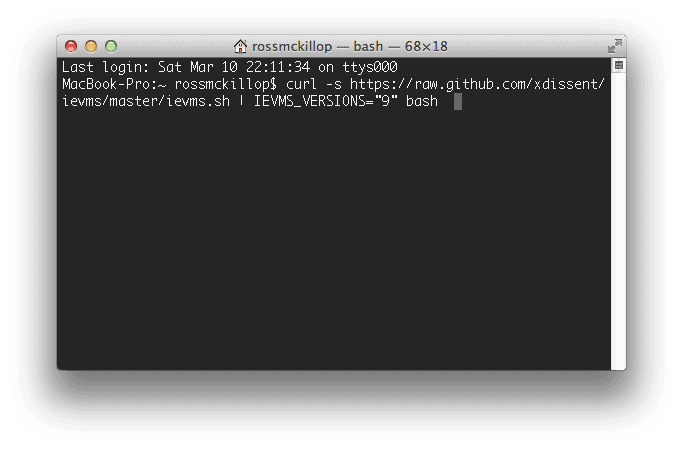
- Open up a Terminal by navigating to Applications -> Utilities -> Terminal. From the prompt, enter the following command:
curl -s https://raw.github.com/xdissent/ievms/master/ievms.sh | IEVMS_VERSIONS=”9″ bash
and hit Enter.
- This is where you’ll want to take a long break. Your Mac is now downloading approximately 13GB of data.
- You can check on the status once in a while but it’s about as entertaining as watching paint dry.
- After the download has finished, the files will be processed.
- When you see Done! in the Terminal window and are returned to the command prompt, you’re finished with the time consuming part. Leave the Terminal window open – we’ll be using it later to delete the unnecessary files.
- Now open VirtualBox from your Applications folder. If you’re prompted to download an update, click the Download button. If you’re not, skip down to step #14.
- Again, click the Download button.
- Now click the Install button.
- If prompted, click Upgrade.
- Scroll all the way to the bottom of the VirtualBox License window (the I Agree button won’t be ‘clickable’ until you do). Click I Agree.
- Enter your password when prompted.
- Finally, click OK.
- Select IE9 (clean) from the column on the left side of the VirtualBox window. Note: you may also see an entry titled ‘IE9 Inaccessible’ – ignore it. Now click the Settings button from the Toolbar.
- Click the System tab from the top menu. Select Motherboard from the secondary menu. Use the ‘slider’ to increase the Base Memory: level. Assuming your Mac has at least 2GB of RAM, I would suggest increasing the Base Memory to 1024MB. Your VirtualBox (IE 9) will run quite slowly if you use much less than 1024MB of memory. Click OK when you’re done.
- With IE9 (clean) still selected, click the Start button.
- VirtualBox will now explain how the Auto capture keyboard feature works. Read this message carefully. In a nutshell it amounts to this – use the left command key on your keyboard to ‘release’ your keyboard and mouse from the virtual machine (IE 9). Click OK.
- Windows will now boot.
- If a mouse pointer integration message appears, ignore it and click OK.
- Once Windows finishes setting itself up and boots, select the Administrator ‘button’. Note: NOT the “Admin” user. Use the password: Password1
Note: the password is case sensitive – the P in Password1 must be capitalized.
- Now you’ll sign into Windows.
- The Windows Activation window will appear. Click Ask me later. You’ll be presented with this screen every time you launch your IE 9 Virtual Machine – click Ask me later every time.
- You will have a complete Windows 7 working environment, including Internet Explorer 9.
- Now you can test out web sites in IE 9, access those “Internet Explorer only” sites etc.
- Bring that Terminal window back up. Enter the command:
cd .ievms
- Now enter the following commands, one at a time:
cd vhd
cd IE9
rm *.rar
rm *.exe
lsAfter entering the “ls” command, you should see two files (and only two files) – Windows 7.vhd and Windows 7.vcm.
- That will have cleared up about 13GB of hard drive space, leaving only the files required to run Windows 7 and IE 9. You can quit the Terminal now – you’re done!


@xbeton0L:disqus : this isn’t just installing IE9. It’s an entire windows install.
But seriously everyone… 13 gigs for an internet browser? What??
this is awesome, but I have another question. How do I completely remove it from my computer?
No, really, I wrote straight citation marks around the 9. Unfortunately this page changed it to curly “smart” quotes. They don’t work.
Nadeem, change the ”9″ to “9”. It will help you
HI,
I have gone through the steps above and get the following error: ERROR: Invalid IE version: ”9″. Please advise