Using the following steps, I have never been shut out of a concert or event that I wanted to attend. This includes getting tickets for the hugely popular events such as Pearl Jam shows, both nights of the Rock and Roll Hall of Fame concerts at Madison Square Gardens, playoff hockey games etc.
First up, I have consistently found that using the Internet and ticketmaster.com and/or livenation.com is the ideal way to get the best tickets possible. Using the phone to call Ticketmaster when the tickets go on sale will only lead to you hearing a busy signal. Lining up at a Ticketmaster or event outlet is never a good idea, and here’s why. If the person at the ticket booth/cash register is at all slow, ie. tickets go on sale at 10AM and the person selling the tickets isn’t ready until 10:05AM, all the good seats will be gone by then. If you’re even second in line, by the time the first purchase has been completed by the person in front of you, all the good tickets will be gone. Always use the Internet to get the best possible seats/tickets. Here’s how you go about doing just that –
1. Setting the clock
2. Advanced Ticket Sales
3. Using Ticketmaster
4. Use a VPN on another Computer, Tablet or Smartphone
5. Go to work
1. Setting the clock
No, not your alarm clock – the clock on your computer. I couldn’t possibly count the number of times I’ve heard someone say “I got to Ticketmaster.com right at 10:00AM when the tickets went on sale, but they were already sold out!”. What really happened was they got to Ticketmaster when they thought it was 10AM. Just because your watch or PC time says it’s 10:00AM, doesn’t necessarily make it so. Even being off by 10 or 20 seconds can make the difference between a great seat, and one way, way back.
To fix this, sync your computer’s time with the Atomic Time.
Select your Operating System from the list below to setup/confirm you’re using Atomic Time sync.
1. OS X
2. Windows Vista and/or Windows 7
3. Windows XP
Setting up OS X with Atomic Time Sync
- If you’re using OS X 10.4 or higher (unless your Mac is very old, you almost certainly are), you can check to make sure you’re using Atomic Time by selecting the date/time section of the menu bar, and then click Date & Time Preferences.
- From here, confirm that Set date and time automatically: is checked. Then select Time Zone and confirm that your Mac is set to the correct location.
- You’re done this part – you can jump down to the Advanced Ticket Sales section now.


Setting up Windows Vista and/or Windows 7 with Atomic Time Sync
- Click the time/date section from your Taskbar and select Change date and time settings… from the pop-up menu.
- On the Date and Time tab, confirm that you have the correct Time Zone set. If you don’t, click the Change time zone… button. Note: if your time zone is already set correctly, skip the next step.


- Select the correct time zone for your location from the drop-down menu, and click the OK button.
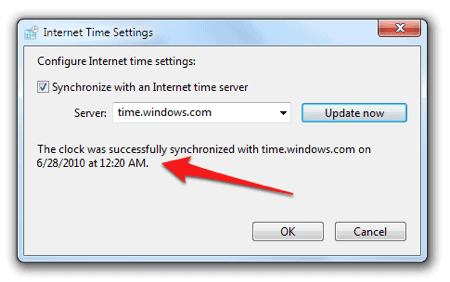
- Now select the Internet Time tab from the top. Click the Change settings… button.
- Make absolutely certain that Synchronize with an Internet time server is checked. Then click the Update Now button.


- You should now see that Windows has updated the time. You’ll also want to do this step 10 or 15 minutes before tickets go on sale so that your PC’s clock is set exactly perfectly.
- You’re done this part – you can jump down to the Advanced Ticket Sales section now.


Setting up Windows XP with Atomic Time Sync
Windows XP has a built-in feature that allows you to sync your PC with an atomic clock, although the default server that it uses has been problematic in the past. Because of this, I suggest using Atomic TimeSync, a free Windows utility (for 95, 98, NT, 2K, ME and XP).
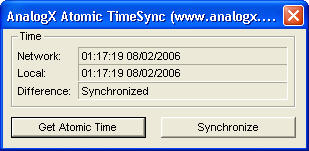
- Run Atomic TimeSync 10 or 15 minutes before the tickets go on sale (make sure that you’re online)
- Double-click its icon in your system tray
- Click the Get Atomic Time button, and then the Synchronize button
- If everything was successful, you can skip the next few steps and move on to the using Ticketmaster section.
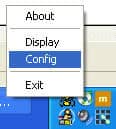
- If you had a problem getting the Atomic Time, first make sure your Internet connection is working. If you’re certain that you’re online, you might need to switch the server that Atomic TimeSync uses. To do this, right-click the Atomic TimeSync icon in your system tray and select Config
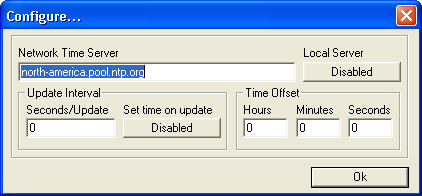
- The default Atomic Clock server should be time-a.timefreq.bldrdoc.gov in the Network Time Server field. If you live elsewhere, visit this site to find an Atomic Time server for your area.
- Repeat step #3 and you should be set.
- You’re done this part – you can jump down to the Advanced Ticket Sales section now.

2. Advanced Ticket Sales
Make a list of all the bands (teams, events etc) you like. One by one visit their official home pages and sign up for their mailing list. “Like” them on Facebook and follow them on Twitter. If they have a forum, give it a read and see if there’s a Fan Club or something similar. Many bands will do an advanced “pre-sale” for fan club members only. Fan club members will receive a password and then use it to sign in to Ticketmaster at the time of the pre-sale. I would still strongly suggest following all of the steps outlined in this tutorial even if you have access to the fan club pre-sale, because those special pre-sales often have a limited number of tickets available.
Ticketmaster also has some form of partnership with American Express, and many events have an “American Express only” pre-sale, where you must use an AmEx to purchase tickets. If you’re really serious about getting tickets, consider getting an American Express card.
3. Using Ticketmaster
Ticketmaster and Live Nation have implemented a number of tricks to stop you from getting the tickets you want. Actually, what they’ve done is try to keep things “fair” and avoid system crashes on their end. Here are some ways to maximize your chances of getting those tickets.
- Most important – create your Ticketmaster account, and sign in to it, before the tickets go on sale. This ensures that you 1) won’t find out at the last minute that you’ve forgotten your Ticketmaster password and 2) decreases the number of steps you’ll have to go through when buying tickets.
- Do not use your browsers Refresh button, at all, on Ticketmaster.com. Ticketmaster uses cookies, your IP address and who-knows-what-else to track exactly what you’re doing. Going to the event page a minute before tickets go on sale and hitting refresh will almost certainly guarantee that you do not get tickets.
- Instead, enter the artist/team/event name in the search field, and as soon as your computers clock changes to the onsale time, click Search.
- You’ll be presented with either a page to narrow down your search (image 1) or a list of events (image 2). To find out which of the screens that you’ll get, try this search ahead of time (the day before the tickets go on sale)
Your goal should be to get to a screen that says Find Tickets directly next to the event you want to attend, 1 (one) click after the time the tickets go on sale.
![]()
![]()


4. Use a VPN on another Computer, Tablet or Smartphone
If you have a 2nd computer (or iPad, Smartphone, tablet…) handy, use a VPN on that computer or device so that it has a different IP address from your ‘first’ computer. All devices connected to your home network, WiFi or otherwise, share the same IP address – unless one of them is using a VPN. If your second computer/device has a different IP address, you can use both to try and get tickets, doubling your chances. Using a VPN is remarkably simple, and we have detailed instructions on how to set one up for the following Operating Systems (links open in a new window/tab):
Make sure to visit http://www.whatsmyip.net from each browser, and make sure that your IP shows up differently in each.
5. Go to work
Literally. If you work somewhere that has a broadband connection, and it’s better than your home dial-up, DSL or cable, use it. The added bonus of doing this at work is that you can recruit some of your co-workers to help. Make sure they all have Ticketmaster accounts already created, with their own credit card added to the account etc. If one of your co-workers ends out getting the best tickets, you can just pay him/her back and have them follow through with the ticket purchase.
My parting piece of advice is to try this with an event you don’t really want to go to (just don’t actually purchase the tickets at the end). Use a Rolling Stones, Madonna or Britney Spears concert or playoff sporting event as a test. They’re usually very difficult to get tickets for, and make for excellent practice runs until you have the process down pat.

