This step by step guide will show you how to fix out of sync audio and video in a video file.
There are two ways to fix out of sync audio and video – one is temporary and quick, the other is permanent and a bit more involved, although still quite easy.
Temporarily Fix Out of Sync Audio and Video
The quick solution is to use the amazing (and free) media player – VLC, and its easy to use built in audio delay/forward feature. If you aren’t using VLC yet, head over to their download page and give it an install. Note: this will work for all video formats, not just mkv/mp4/avi – they’re just common formats (and the 3 that I’ve found most often have sync issues).
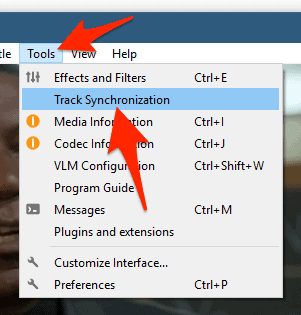
- Open the video with the out of sync audio in VLC and then select Tools -> Track Synchronization (Mac users: select Window -> Track Synchronization)
- Locate the section titled Audio/Video – within that window there’s a ‘timer’ with “up and down arrows” to adjust the timing of the audio. This is where the magic happens.
- Use the “up arrow” if the audio is ahead of the video. That means if the people in the video are talking and you can hear them before their lips move, you’ll want to use the up arrow. That will ‘delay’ the audio, allowing the video to ‘catch up’.
So in reverse, if the audio is behind the video you’ll want to use the “down arrow”. That will speed the audio up.
In both instances, when you use the up and down arrows it will adjust your audio by 1/10th of a second per click. Let the video play while you’re making the adjustments – but note that it’ll take a second or three for the change to take place each time you adjust the sync timing.


Permanently Fix Out of Sync Audio and Video
To permanently fix out of sync audio and video, you’ll need to download an open source (free) video editor, Avidemux. It’s cross-platform which means it’s available for Windows, macOS and Linux.
Note: the screenshots used below are from a Mac, but the steps and screens are nearly identical if you’re using Windows or Linux and you should have no trouble at all following along.
- Once you’ve downloaded and installed Avidemux, open it.
- Select File -> Open…
- Navigate to the video file that’s out of sync, select it and then click Open
- After a few moments the video will open up in Avidemux. Use the “timeline slider” (see screenshot below) to move the video forward a bit.
- With the video paused, place a check in the box labelled Shift, which can be found in the Audio Output section.
- Use the “up arrow” in the Audio Output section to increase the number of milliseconds if the audio is ahead of the video. That means if the people in the video are talking and you can hear them before their lips move, you’ll want to use the up arrow. That will ‘delay’ the audio, allowing the video to ‘catch up’.
So in reverse, if the audio is behind the video you’ll want to use the “down arrow”. That will speed the audio up.
- Use the Play button to determine if the video is now in sync with the audio and keep adjusting with the up and down arrows until it is.
- Once you’re happy with the result, select File and then Save
- Give the video a new/different name so that you don’t overwrite the original, which you can delete later once you’re sure the new video is perfect. Leave the video type as mkv and then click the Save button.
- Give Avidemux a few moments to do its thing.
- Ta-da! All done. Click the OK button and then exit out of Avidemux. Open your newly created video file in your player of choice and make sure it’s all synced up.


Other Resources
How to Add Bookmarks to a Video
How to Extract Just the Audio from an MP4 File

