This detailed guide will take you each step of the way through setting up your iPhone for the first time. This is the first in a series of “getting to know your iPhone” tutorials. It will be updated frequently with links to other helpful iPhone tutorials, tips and tricks. Scroll to the bottom of this guide for a list of very helpful tutorials relating to setting up and using your iPhone.
- Lets start from the very beginning. Turn your new iPhone on. Swipe the ‘slider’ at the bottom of the screen to begin the setup procedure.
- Select the language you wish you use on your iPhone, and then tap the “Next” (arrow) button in the upper-right corner of your screen.
- Select your Country and then tap the Next button.
- At this point your iPhone will scan for Wi-Fi networks and display the results. If you’re not near a wifi hotspot (nothing appears in the list) – tap the Use Cellular Connection. Otherwise, tap the WiFi Network you want to connect to
- Enter the password (if required) for the WiFi Network you’re connecting to, and then tap the Join button.
- Once you see a “check mark” next to the Wireless Network, that means you’ve successfully connected to it. Tap the Next button.
- From here on out you’ll be making selections based on your personal preferences. Any feature you enable (or disable), use or don’t use – can all be changed later. So don’t worry too much about each step, again, you change all of this later.
First up is Location Services. This feature allows Apps (like Maps, Camera, Safari, and many others) to use information from cellular, WiFi, and GPS networks to determine your location. You can also decide exactly which Apps have access to this service/feature (your location) – so it’s not an “all or nothing” endeavor. Select Enable Location Services and then tap the Next button. For detailed information on Location Services, see this Apple KB article (link opens in a new window/tab).
- Select Set Up as New iPhone and tap the Next button.
- Now you’ll need to enter your Apple ID. Use your iTunes account information here. If you don’t have an Apple ID/iTunes Account, tap the Create a Free Apple ID and follow the Account creation process. Otherwise, tap the Sign In with an Apple ID button.
- Enter your Apple ID (most often the email address you used to create your Apple account) and password in the provided spaces. Tap the Next button.
- Review all of the Terms and Conditions (uh-huh) and tap the Agree button.
- Tap Agree again.
- Just as the screen says, this can take a minute or three.
- At some point in time, you’re probably going to want to use iCloud. Even if you don’t, this is a feature that’s very easy to disable later on. Select Use iCloud and then tap the Next button.
- Personally, I opt to backup most of my iPhone information to my Computer via iTunes. There are some things that I backup to iCloud. For me, the easiest path is to select Back Up to My Computer and then later set up the few items I want to also back up to iCloud. My suggestion is to select Back Up to My Computer, see if that works well for you, and if not – change it. Tap Next to continue.
- I would strongly suggest enabling the Find My iPhone service. It’s free, it’s helpful if for no other reason than making it very easy to find your iPhone when you just can’t find it in your house. In addition to this relatively minor feature, it also enables you to really find your iPhone if you lose it. It also allows you to remotely lock your iPhone, and even erase the entire contents of your iPhone if you’re sure it has been stolen. Select Use Find My iPhone and tap the Next button. At the end of this guide look for the link to another tutorial that completely goes through the process of setting up and using the Find My iPhone Service tutorial.
- Select Use Siri and then the Next button.
- Decide if you want to send information to Apple to help them improve their products and services, then tap the Next button.
- Decide if you want to Register with Apple and then click the Next button.
- Finally, tap the Start Using iPhone button.
- Gottcha! Not so fast. The chances are good that there’s a Software Update for your iPhone waiting for you. It’s just the way these things go. You might as well get it over with now. Tap the Details button.
- Your iPhone will check for all available updates…
- … and decide which one to suggest you install first. Whatever it may be, tap Agree, Download and Install – whichever option ‘sounds’ like it will begin the installation.
- Again, if prompted to Install, Agree or Download – do so.
- Sometimes you get to watch what’s going on :)
- You’re probably starting to see the pattern. Tap OK, Agree – whichever option sounds most ‘positive’.
- Likely, your iPhone will check for more updates. Don’t worry – this isn’t a very frequent process. Think of it as “getting it out of the way with”.
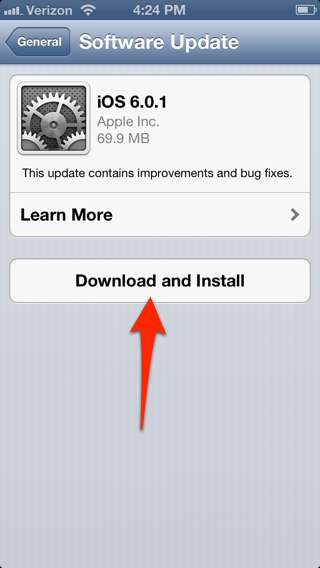
- Tap Download and Install.
- Again, Agree.
- Continue. During some of these updates, do not be surprised if your iPhone powers itself off and back on again. This is perfectly normal.
- Finally – your iPhone Home Screen!!!!


Additional iPhone “Getting Started” Resources
At this point, you can start using your iPhone. It’s ready to go. Here are some suggested next steps.
- How to Set Up Your Email Account On Your iPhone
- How to Email Photos From Your iPhone
- How to Locate your iPhone if it’s Lost or Stolen. Note: this is the tutorial mentioned in the setup process for the Find My iPhone service back in step #16 above.
- How to Close Apps on Your iPhone or iPad
- How to Sort your iPhone Contacts by First Name
- How to Remove the Stocks Widget From Your iPhone Notification Center
- How to Change the Wallpaper on Your iPhone or iPad
- How to Disable Installing Apps on Your iPhone or iPad (this is particularly helpful if your children will be using your iPhone or iPad)
- How to Disable In-App Purchases on Your iPhone (again, this is very helpful if your children will be using your iPhone)
- How to Take a Screenshot of your iPhone
- How to Step Text Messages From Displaying on Your iPhone Lock Screen
- How to Stop iPhoto from Automatically Opening When You Plug In Your iPhone
- Many more to come – bookmark this page!

